Difference between revisions of "Battlefields"
m |
m |
||
| Line 155: | Line 155: | ||
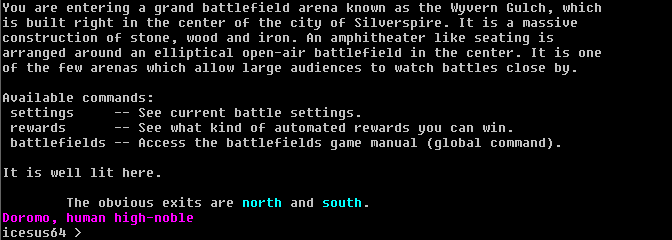
So go to the entrance of Wyvern Gulch with your friend with each carrying your company in your inventory. | So go to the entrance of Wyvern Gulch with your friend with each carrying your company in your inventory. | ||
| − | === | + | === Place your bets === |
[[File:Entrance of Wyvern Gulch.png|300px|frame|left|At the entrance of Wyvern Gulch.]] | [[File:Entrance of Wyvern Gulch.png|300px|frame|left|At the entrance of Wyvern Gulch.]] | ||
| − | + | From here, both players go 1 north. | |
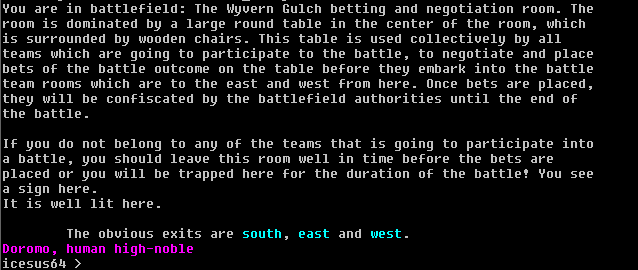
[[File:Negotiation stage.png|300px|frame|right|Negotiation and betting stage of battle.]] | [[File:Negotiation stage.png|300px|frame|right|Negotiation and betting stage of battle.]] | ||
| Line 170: | Line 170: | ||
Now, I go 1 west, to team #1 ready room. Doromo goes 1 east, to team #2 ready room. | Now, I go 1 west, to team #1 ready room. Doromo goes 1 east, to team #2 ready room. | ||
| + | |||
| + | === Readying your team === | ||
In the ready room, both players type 'ready'. | In the ready room, both players type 'ready'. | ||
Revision as of 21:58, 26 March 2020
Contents
Features
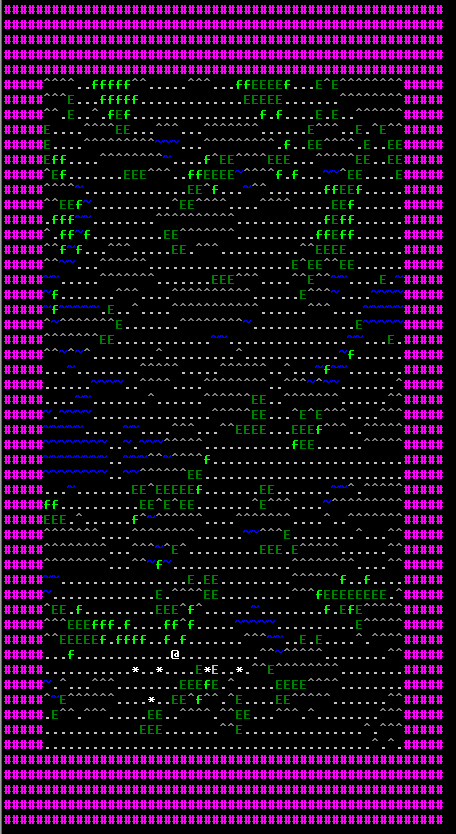
- Line of sight, direct and indirect fire, terrain height differences. (in above screenshot the enemy is in the north, but it is not seen by selected friendly force)
- Also other units visible on battlefields (not just the lonely @).
- The whole battlefield is shown at once in a tabletop manner so you won't miss any action.
- Turn based, squad and platoon level (somewhat X-com like) gameplay.
- Tournament ladder based campaign play: skirmishes (squad level), minor victories (platoon level), major victories (company level).
- Skirmish level matches are newbie (budget) friendly and possible without provinces. It is possible to advance from skirmishes to minor victories, from minor victories to major victories (may mean seizing provinces to yourself).
- Supports different mainguilds and kingdoms/allegiances.
- Your units save from battle to another, enabling tuning, improving and maybe trading of your forces outside of battle.
Campaign Plans
Campaign plans contain various scenarios and ladders for achieving different game goals through battlefields.
Province acquisition
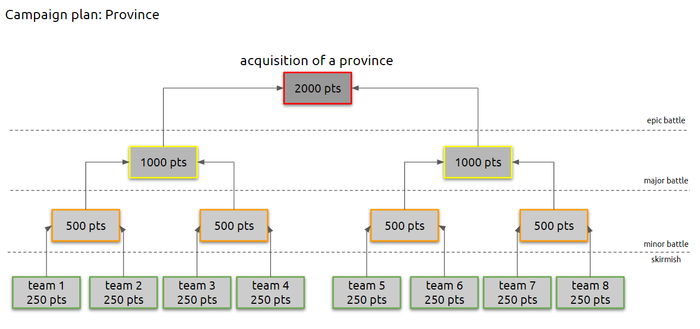
This campaign plan will start with 8 team skirmishes, which will lead into 4 minor battles, which will lead into 2 major battles, which will lead into 1 epic battle. The winner of the epic battle is usually given a province.
The "pts" means the maximum allowed battle value of a team for the said battle.
Instructions
This section will contain instructions on how to prepare and conduct battles.
Anatomy of battle
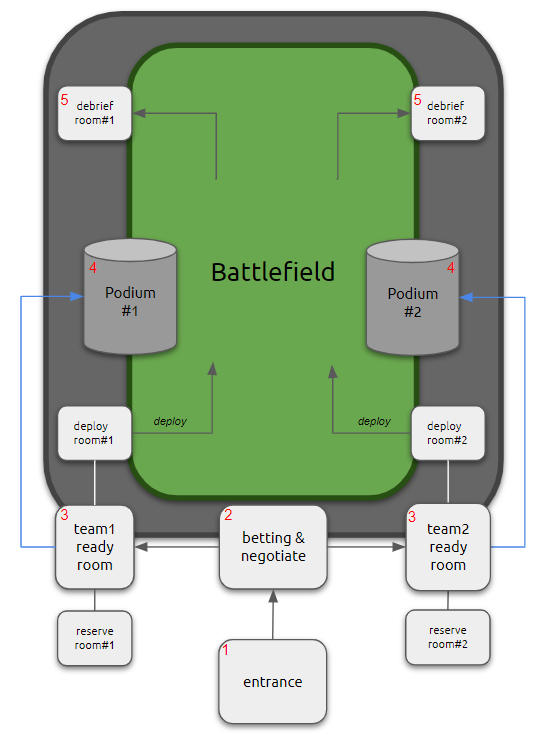
The anatomy of battle follows a certain procedure which is common to all battlefields. See picture "Anatomy of a Battle", which illustrates a default setting for a battle for two teams. See the red numbers in the picture. The subchapters will describe each step one at a time.
Entrance to the battlefield
Entrance is meant for battle audience - which means players who simply wish to observe battles without partaking in them.
This room is used to follow on-going battles as most of battlefield informs will be relayed into this room during active battles. To follow an on-going battle, no specific commands are needed as the information will be relayed automatically as the battle proceeds.
Betting and negotation room
This is the room where teams may negotiate, draw some initial boundaries and ultimately set the winner's prize for the forthcoming battle.
What you need to do here, step by step:
1. Gather two teams: Invite at least two players to form two opposing teams and get all members of both teams here. Each team can have more than one member. Each member of the team is expected to stay throughout the duration of the battle. It is possible to have one-player teams, so two players is the minimum to fight.
2. Negotiation and betting: Once all members are here, negotiate with the other team what is going to be the bet of this battle. The winning team will always have full rights and ownership to whatever the bet was placed. You can simply drop the items, or money that you want to place into the bet, on the floor.
3. Lock bets: Once both teams are in agreement about the bet which is placed on the floor of this room, type 'bet'. This command will lock the bet for the battle. Note that you can always use 'unbet' if you decide the bet is after all not satisfactory and dismantle the deal.
Team ready rooms
Team rooms are used for finalizing negotations for battle and organizing your battle force for deployment stage, which is the first stage of any battle.
What you need to do here, step by step.
1. Negotiate the remaining battle details with the other team: a. what is the minimum battle force both teams will deploy in battle (can be different between teams) b. what is the maximum battle force both teams will deploy in battle (can be different between teams)
First, look at 'settings'. The 'battle force limits' indicates which is the so called hard floor and ceiling of battle value that is possible to deploy into this battle. With these hard limits in mind, you can use commands 'forcemin' and 'forcemax' to adjust limits that you are willing to impose on your team. The opposing teams can naturally do the same, until you reach an agreement of what kind of force all teams are going to deploy.
2. Label your team. Give your team a name by using command 'label'.
3. Choose whether you want to pick starting locations your force in the battlefield manually, or do you want starting locations be picked randomly. Use command 'pickstart' to do this.
4. Choose which tactic your team is going to employ by using the 'tactic' command. You have three tactic options available:
- attack: Your force may hold up to half of its units in reserves. You can deploy your reserves at any point later in the battle (whereas in probing you must deploy reserves after first battle turn.)
- defend: Your force may deploy all of its units at once. You have the entire firepower of your force available from the beginning of the battle.
- probe: Your force may deploy up to half of its units during first battle turn AND reserves will be deployed automatically after this first battle turnm, in 2nd battle turn. this means you will have one entire battle turn for probing the battlefield before your entire force can be targeted by e.g. enemy archers.
5. If everything in 'settings' can be agreed with the other teams, you can type 'ready' to raise a flag indicating your team is satisfied with the agreed battle parameters. However, command 'unready' will dismantle this agreement if it turns out there are still details under dispute and which prevent your team's readiness.
6. Depending on your tactic, place your deployment forces on the floor of the deployment room to the north. Then, place your reserve forces on the floor of the reserve room to the south. You can use command 'settings' at all times to see how much force you are about to deploy, how much you keep in reserve, and how much your team has in total.
7. Once you are done with placing your deployment and reserves, all members of your team need to return to the team's ready room. Then, type 'deploy' and your tactic, deployment and reserves plan will be inspected. If you need to correct something, you will be told what. If all is good, 'deploy' command will set your team ready and locked.
Note: All players must clear the deploy and reserve rooms and proceed to the team ready room before deployment stage of battle can begin.
8. Deployment into battle starts automatically once the last team to participate is ready and locked. Who deploys first will be determined randomly. You will be informed when it is your team's turn to deploy. When this moment comes, type 'startdeploy' to deploy your forces. At this point you and your team will be transferred to your team's podium in the battlefield, from which you will find more instructions on how to deploy your forces.
Podium
Podium is another name for the seating box by the side of the battlefield. From here you can effectively guide your troops in battle without needing to leave anywhere.
Your team will stay in the podium for the duration of the battle. A battle ends when victory conditions are met (default: all enemy forces are killed), or the other team surrenders and there is only one active team left.
Debriefing room
Once a battle comes to an end, all teams with their surviving and wounded forces will be lead into their respective debriefing rooms. Each team will have their debriefing in their own dedicated debriefing room.
Each team will now be able to share their loot, surviving forces and in addition they will also receive the prize which was agreed to be passed to the winning team of the battle. In the end of an epic battle, this reward can also be external, e.g. a province.
Once all teams mark debriefing as done (by typing 'done' in the debriefing room), an exit will open which will allow members of both teams return back to the arena entrance.
At this point, you have witnessed the horrors of battlefield and you will bear the mental scars caused by it for the remainder of your life. Until the next inevitable battle.
Tutorial
Creating a mercenary company
Mercenary companies are easy way to start battlefields. Once you've learned the ropes of playing mercenaries, you might want to consider selecting your allegiance and start playing for some specific kingdom. However, for the purpose of this tutorial we will first create a mercenary company.
Note that this tutorial assumes you have not yet selected your allegiance, which the system will interpret as you will play mercenaries by default.
Hiring your people
To hire mercenaries, you need to go to the Mercenaries battlefields shop which is located in Vaerlon, 8 rooms east from the Double Dragon inn.
Hiring costs some of your experience and silver, so you will need to have a total of 100k experience and also 100k of silver on you to complete this tutorial.
In the mercenaries shop, type 'list'.
First, you need a leader. Type 'hire mercenary veteran'. My new mercenary veteran's name is Mongrel.
Then, hire two mercenary regulars by typing 'hire mercenary regular' twice. These two new regulars are named Edge, and the other is named Raine.
As your new hires will be delivered to your inventory, drop them: drop all mercenary
Now, we can build the company by using command "trooper". Type 'trooper mongrel do squad-assign to alpha', 'trooper edge do squad-assign to alpha', 'trooper raine do squad-assign to alpha'.
All three have now been assigned to a squad named 'alpha'. Type 'roster' to verify.
Your mercenary squad is now ready. You can 'get all mercenary' and continue.
Note: Outside of battle, all battlefield assets like these mercenaries are represented in form of tokens, which is not an unusual way for any wargame player to organize their rank and file. In this inactive form, they are almost weightless, saveable objects you can get and drop and manipulate normally. You can also save them over boot, so your company won't be lost even if you're not in battle. The only way you can lose them is in battle.
Finding an opponent
Battlefields is designed for minimum of two players. So to try out your mercenary force in battle, ask another player to join your battle and ask him to do the steps you just did above. Once you and your friend have a mercenary company ready and with their squads assigned, you are ready for battle.
Go to battlefield of Wyvern Gulch
By using command 'roster' you will find out that the total battle value of your mercenary force is a total of 85 points.
There are a total of five battlefields in Silverspire.
Each of them has a specific lower and higher battle value limits specified and battle value of your company and your friend's company must be within these limits.
The Wyvern Gulch, located right in the center of Silverspire, has a minimum battle value of 50 and maximum of 250. So it will do perfectly fine for testing of our mercenary power.
So go to the entrance of Wyvern Gulch with your friend with each carrying your company in your inventory.
Place your bets
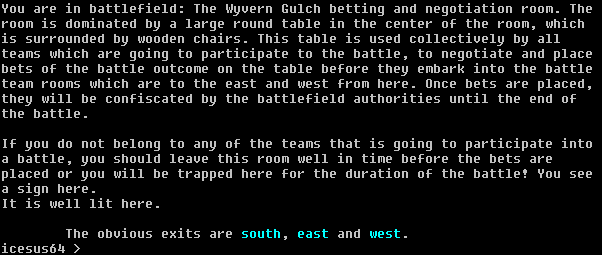
From here, both players go 1 north.
Type 'settings'
Type 'drop 1 mithril' (have 1 with you!) This will be our battle bet. Regardless of the bet, if there are sufficient victories in the battle, there will also be additional automated rewards.
Type 'bet'
Now, I go 1 west, to team #1 ready room. Doromo goes 1 east, to team #2 ready room.
Readying your team
In the ready room, both players type 'ready'.
Now, both players go 1 north and drop all your mercenaries on the floor of this room. So I will drop my mercenaries in the floor of deployment room of team #1 while Doromo will drop his mercenaries on the floor of deployment room of team #2.
Both players go 1 south, back to team ready room.
Both players type 'deploy'
Miscellaneous tips (unofficial)
- If you use commands 'next', 'prev', 'nextlead' or 'prevlead', it means 'you are letting go of your current token.' Therefore, any unfinished actions with your current token will be ended.
- Do not travel in tight packs near the enemy. Break into formations because indirect long bow arrow volleys are brutal reality and WILL be employed by any commander worth his paycheck. It is a good practice to have a point leading the rest of the team. Do not make your unit leader be this point. Take a tip from Antti Rokka: https://www.youtube.com/watch?v=ZbcVa3Q16Y0
